
Getting started with Dactyl Manuform and QMK keymaps
8/31/2020
I recently switched from a Kinesis Advantage to a Dactyl Manuform 6x6. I found a lot of guides on building a Dactyl, but most of them glossed over the QMK firmware part of setting up your keyboard.
In this guide, I’ll give you the basics for getting starting with QMK and
flashing your own custom keymap onto the keyboard. The guide is MacOS-centric,
so you might need to replace a few steps (like brew install) with your
operating system’s analogs.
At the very end, I’ll share some tips for keeping your keymap in your own Git repo without needing to maintain a heavyweight Github fork of QMK.
Choose where to install QMK #
You can configure where to install QMK by setting the QMK_HOME variable. It’s
handy to set this up even if you want the default location, so just do it real
fast. I’ll choose to install it in ~/.qmk_firmware, but you can put it
wherever you want:
# use ~/.zshrc, or whatever shell rc file you use
$ echo "export QMK_HOME=\"$HOME/.qmk_firmware\"" > ~/.bashrc

# update your current running shell
$ source ~/.bashrc

# make sure the variable is now set in your shell
$ echo $QMK_HOME
Setup QMK #
First, install QMK from Homebrew:
$ brew install qmk/qmk/qmkNext, run the setup. You can probably answer Yes to every question it asks.
It will ask you to confirm you want to install QMK to the $QMK_HOME location
you chose in the prior step.
$ qmk setupIf you ls $QMK_HOME, you should now have a copy of qmk_firmware cloned from
Github.
Find your Dactyl keyboard’s QMK directory #
QMK has first-class support for the Dactyl Manuform. You’ll need to find the
directory for your particular flavor. Mine is the 6x6 version, so my config
directory is located at $QMK_HOME/keyboards/handwired/dactyl_manuform/6x6.
If you have the 5x6, replace the path with 5x6, and so on. Just poke around
in the dactyl_manuform directory until you find the right one.
Copy the default keymap #
You’ll want to copy the default keymap to your own directory, so you can edit
it without dirtying up the QMK repo. As always, replace 6x6 with your flavor
in all the paths.
Call your new keymap custom, so you know it’s yours:
$ cp $QMK_HOME/keyboards/handwired/dactyl_manuform/6x6/keymaps/default \
  $QMK_HOME/keyboards/handwired/dactyl_manuform/6x6/keymaps/custom
Next, copy in the base rules.mk file. You’ll probably edit this at least once
or twice, and it’s good to have one scoped to your custom keymap directory.
$ cp $QMK_HOME/keyboards/handwired/dactyl_manuform/6x6/rules.mk \
  $QMK_HOME/keyboards/handwired/dactyl_manuform/6x6/keymaps/custom/rules.mk
You now have a fresh copy of the default keymap inside keymaps/custom, ready
to make whatever edits you want.
Optional: Enable Elite-C boards to be flashed #
The default Dactyl Manuform config assumes that Pro Micro controllers are being used. If you happen to be using the Elite-C boards like I do, you’ll need to make one edit to your custom/rules.mk file:
# Enable the Elite-C board
BOOTLOADER = atmel-dfu
If you don’t do this, the flashing step will not work.
Compile the firmware .hex file #
At this point, you should practice compiling the .hex file that gets flashed
to the keyboard, before making any keymap edits.
Assuming you’re using the handwired/dactyl_manuform/6x6 keyboard and the
custom keymap, you can compile the firmware with this command:
$ qmk compile -kb handwired/dactyl_manuform/6x6 -km customThis will output a $QMK_HOME/handwired_dactyl_manuform_6x6_custom.hex file,
ready to be flashed.
Flash the .hex file to your keyboard with the CLI #
Flashing the hex file is fairly quick once you compile it.
- Plug the USB cable into the left half of the Dactyl.
- Click the hardware “reset” button on the left half (mine is on the bottom and requires a pen/paperclip to press).
- Run
qmk flash -kb handwired/dactyl_manuform/6x6 -km customfrom the command line.
This should write the new firmware to the left half.
Unplug the cable, and plug it into the right half. Follow the same instructions above.
Unplug the cable, and plug it back into the left half. You’re done!
The QMK Toolbox is actually better than the CLI for flashing #
Your Dactyl will be out of commission and you won’t be able to type commands with it while you’re in the middle of flashing. For this reason, you should install the QMK Toolbox, which is a small GUI program that lets you do the flashing instead.
If you have sight issues or otherwise unable to use the GUI due to accessibility with the GUI tool, you can also plug in a second cheap keyboard so you can still do the CLI method above when you need to flash new firmware.
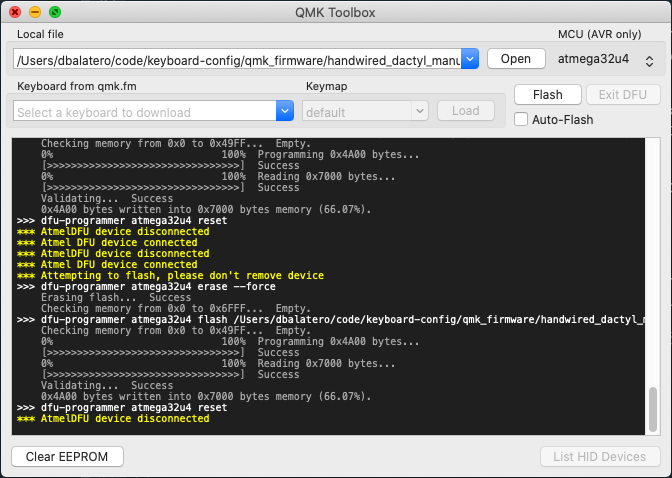
To use this tool:
- Open QMK Toolbox.
- Click the Open button.
- In the file dialog, browse to
$QMK_HOMEand select your.hexfile. - Plug the USB cable into the left half of the Dactyl.
- Click the hardware “reset” button on the left half.
- Click the Flash button.
Repeat the last 3 steps for the right half.
Version control your keymaps #
I’m a big proponent of keeping all your hard-won configuration in version control. This way you’ll never lose it, and you can always revert back to old versions.
You can really quickly create a Git repo to track your keyboard config on the
side, without needing to fork QMK or anything weird like that. This means
updating QMK is easy as git pull, and you don’t have to contend with Git
histories and merges.
Make a Git repo #
mkdir -p ~/code/keymaps
cd ~/code/keymaps
git init .
echo "# My keymaps" > README.md
git add . && git commit -m "First commit"
Move your keymap to the repo #
mv $QMK_HOME/keyboards/handwired/dactyl_manuform/6x6/keymaps/custom \
  ~/code/keymaps/dactyl_manuform_custom

git add . && git commit -m "Moved custom keymap to Git"
Make a setup script #
I like my repos to have basic setup scripts, so you can clone them on a new computer and get back to a working state fast.
cd ~/code/keymaps
touch setup
chmod 755 setup
Then open the setup file you just made in your editor, and add:
#!/usr/bin/env bash

# Gets the full path to this keymaps repo's directory
REPO_DIR="$(realpath "$( cd "$( dirname "${BASH_SOURCE[0]}" )" >/dev/null 2>&1 && pwd )")"

function symlink_dactyl_custom_keymap() {
  local source_keymap="$REPO_DIR/dactyl_manuform_custom"
  local symlink_destination="$QMK_HOME/keyboards/handwired/dactyl_manuform/6x6/keymaps/custom"

  if [ ! -d "$symlink_destination" ]; then
    echo "Symlinking keymap"
    ln -sf "$source_keymap" "$symlink_destination"
  else
    echo "Keymap already in place, nothing to do"
  fi
}

symlink_dactyl_custom_keymap
Run the setup script with ./setup. There should now be a symbolic link at
$QMK_HOME/keyboards/handwired/dactyl_manuform/6x6/keymaps/custom pointing to
the dactyl_manuform_custom directory in this new repo.
Commit this script to Git:
git add setup && git commit -m "Added basic setup script"Don’t forget to make a new repository on Github/Gitlab/etc and push it up!
Last notes #
If you want to explore my custom keymaps, I have them at a Github repo.
I also had a tough time figuring out which thumb cluster keys were which when setting up my keymaps. I made an ASCII diagram you can steal, so you never forget:
// Thumb clusters, match to the comments in the keymaps
//
//         +----+
// +----+  |    |                                          +-----+
// |    |  | 2  | +----+                                   |     | +----+
// | 1  |  |    | |    |                           +-----+ | 7   | |    |
// |    |  +----+ | 3  |                           |     | |     | | 8  |
// +----+         |    | +----+             +----+ | 10  | +-----+ |    |
//                +----+ |    |             |    | |     |         +----+
//            +----+     | 4  |             | 9  | +-----+
//            |    |     |    |             |    |        +----+
//            | 5  |     +----+             +----+        | 12 |
//            +----++-----+                        +----+ |    |
//                  |     |                        |    | +----+
//                  | 6   |                        |11  |
//                  +-----+                        +----+
//
const uint16_t PROGMEM keymaps[][MATRIX_ROWS][MATRIX_COLS] = {
  [_QWERTY] = LAYOUT_6x6(

     KC_ESC    , KC_F2 , KC_F3 , KC_F4 , KC_F5 , KC_F6 ,                         KC_F7 , KC_F8 , KC_F9  , KC_F10 , KC_F11 , KC_F12 ,
     KC_EQUAL  , KC_1  , KC_2  , KC_3  , KC_4  , KC_5  ,                         KC_6  , KC_7  , KC_8   , KC_9   , KC_0   , KC_MINUS,
     KC_TAB    , KC_Q  , KC_W  , KC_E  , KC_R  , KC_T  ,                         KC_Y  , KC_U  , KC_I   , KC_O   , KC_P   , KC_BSLASH,
     KC_ENTER  , KC_A  , KC_S  , KC_D  , KC_F  , KC_G  ,                         KC_H  , KC_J  , KC_K   , KC_L   , HYPER_SEMI, KC_QUOT,
     KC_LSHIFT , KC_Z  , KC_X  , KC_C  , KC_V  , KC_B  ,                         KC_N  , KC_M  , KC_COMM, KC_DOT , KC_SLSH, KC_RSHIFT,
                        _______, KC_GRAVE,                                                       KC_LBRC, KC_RBRC ,

                                      // 1         2                               7          8
                                      CTRL_OR_RAISE, KC_LGUI,                      KC_BSPACE, KC_SPACE,
                                        // 3     4                            9        10
                                        KC_LALT, _______,                     _______, MOD_SUPER,
                                          // 5      6                       11    12
                                          _______, _______,                  KC_F1, _______
  ),

  // etc...
};
Hope this was helpful!